Tab: Communication Settings
On this tab of the generic device editor, you define the connection between CODESYS and the device on which your application(s) should run. This includes security settings such as encrypted communication and signing.
Tip
If you prefer the classic mode of display for the dialog, then select it in the CODESYS Options in the Device editor category.
You select a gateway and a target device from the list boxes. The possible selections depend on the entries in the Manage Gateways and Manage Favorite Devices dialogs (see the Gateway menu).
You can also specify the target directly with the IP address (example: "192.168.101.109"), the device address (example: [056D]), or the device name (example: MyDevice). After the device is entered, CODESYS searches for the device in the network of the gateway.
Tip
The option of searching by device name requires unique device names in the network.
The solid circle on the lower right corner of the gateway symbol provides information about the connection status:
Red: CODESYS cannot establish the connection.
Green: The connection is established.
Black: The connection status is unknown.
Tip
Some communication protocols allow regular checking of the gateway so that the status cannot be displayed.
Clicking the solid circle of the target device starts a network scan for the device. This works only if the network is not already being scanned.
Scan Network | This button opens the Select Device dialog. It lists all configured gateways with the associated devices. You can select one target device from this list. If the name of the selected device is unique, then the name will be used in the connection settings. Otherwise, the unique device address is applied. The displayed parameters are defined in the SysTarget component in the runtime system and essentially represent the type plate of the controller. The device name can be changed using the Device → Rename Active Device command. Option: Hide non-matching devices, filter by Target ID:
|
Gateway | This menu includes the following commands:
|
Device | This menu includes the following commands:
|


When you select a new communication policy in this dialog, the configuration in the runtime system is changed. | |
Communication Settings | |
Current policy | Shows the currently selected policy for the encryption of communication with the device |
New policy | List box for the new policy for encryption
|
Code Signing | |
Current policy | Display of the code signing policy which is currently set in the runtime system |
New policy |
|
Device User Management | |
Current policy | Shows the currently selected policy for user management |
New policy |
Corresponding entry in the Security Settings: |
Allow anonymous login |
Corresponding entry in the Security Settings of the device: |
The runtime system password policy configured here is checked in advance in the programming system when the password for a new device user is entered or when the existing password of a device user is changed. ImportantIf a limited validity period for a password is configured in the password policy, then the user is prompted to set a new password when logging in after this period has elapsed. Note: To change a password before it expires, a user currently still requires read permission for the device user management. | |
Password policy is active |
The corresponding entries in the Security Settings of the device are located under the [CmpUserMgr] SECURITY.UserMgmt.PasswordPolicy=ENABLED . Password settings
The following rules for the password always apply, even when the rules are partially or completely disabled:
|
Password expiration is active |
Corresponding entries in the Security Settings of the device: Under the Password expiration settings:
|
Login lock is active |
Corresponding entries in the Security Settings of the device: Under the . Login lock settings
For information about unlocking a locked user, see: Handling of Device User Management |
In the CODESYS options, you can activate the classic mode of the dialog in the "Device editor" category).
Select the network path to the controller | Gateway channel for the connection Select the channel from the lower part of the view. |
Left side of view | Tree structure of the configured gateway channels with the connected devices in the local network: 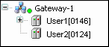 Note: CODESYS saves these entries on the local system, not in the project. The device entries are preceded by a Click Scan Network to refresh the list. Note: If you created the first project on the local system, then the local gateway is listed as an entry in the tree by default. CODESYS starts this gateway automatically on system boot. The solid circle on the lower right corner of the gateway symbol provides information about the connection status:
Each of the device entries in the tree consists of a symbol followed by the <device name> [device address]. On the right side of the view, you also see the Target ID, Target Name, Target Type, Target Vendor, and Target Version. |
Right side of view | Information about the gateway channel of device selected on the left side of the view When a gateway channel is selected in the left view, the following information is displayed: Device name, IP address, Port, Driver When a device is selected in the left view, the following information is displayed (depending of the device): Device name, Device address, Number of channels, Block driver, Serial number, Encrypted communication, Target vendor, Target ID, Target name, Target type, Target version. |


Filter | You can reduce the displayed list of devices that have the same Target ID as the current device configured in the project. |
Sorting order | You can sort the list by Name or Device Address in alphabetical or ascending order. |
Set Active Path | The command sets the selected communications channel as active. Double-clicking the entry in the channel tree achieves the same result. |
Add Gateway | The command opens the Gateway dialog where you can define a gateway which CODESYS should add to the current configuration. |
Add Device | The command opens the Add Device dialog. Here you can manually define a device that is to be inserted under the gateway entry currently selected in the tree. Note the functionality of Scan Network as well. |
Scan Network | The command starts a search for available devices in the local network. The configuration tree of the gateway is refreshed accordingly. |
Scan for Device by Address | The command searches the network for devices with a unique address as given in the configuration tree. CODESYS displays the detected devices with the given address below the gateway. The search always applies to the devices below the selected gateway or below the selected entry. |
Scan for Device by Name | The command searches the network for devices with the same name as given in the configuration tree. Capitalization is ignored. CODESYS displays the detected devices below the gateway with the given name together with its unique device address. The search always applies to the devices below the selected gateway or below the selected entry. |
Scan for Device by IP Address | The command searches the network for devices with a unique IP address as given in the configuration tree. CODESYS displays the detected devices with the given address below the gateway together with its name. The search always applies to the devices below the selected gateway or below the selected entry. |
Send Echo Service | CODESYS sends five echo services to the controller. These are used to test the network connection, similar to the "ping" function. The services are sent first without a payload and then with a payload. The scope of the payload depends on the communication buffer of the PLC. A message view opens with information about the average echo service delay and the scope of the sent payload. |
Delete Selected Device | The command deletes the selected device from the channel tree. |
Edit Gateway | The command opens the Gateway dialog for editing the settings for the selected gateway. |
Configure the Local Gateway | The command opens a dialog for configuring a local gateway. This provides an alternative to manually editing the |
Don't store communication settings in project |
|
Confirmed Online Mode |
|